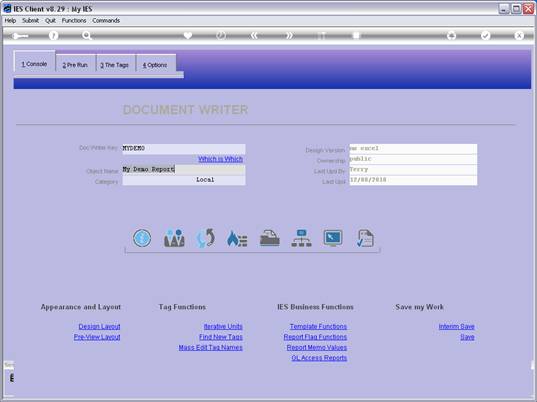
Slide 1

Slide notes: Conditional Tags are quite useful, and we have designed a Demo Report here to illustrate some examples of how Conditional Tags can be applied productively.


Slide 2

Slide notes: We start by looking at the Layout.


Slide 3

Slide notes: We have a Tag that will always show a Value, in this case for the Bank Account, irrespective of whether the Bank Balance is positive or negative. This is the normal state for a majority of Tags on all Reports.


Slide 4

Slide notes: We have another Tag that is exactly the same as the previous Tag, except that it never shows it's Value. This is a demonstration of how we can use hidden Tags that have Values that can be used by other Tags, but they never show their own Values in the final Report.


Slide 5

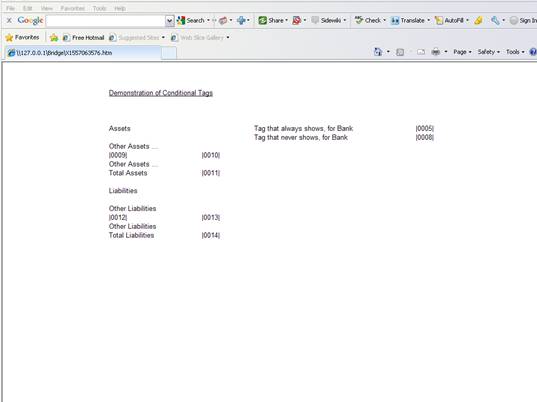
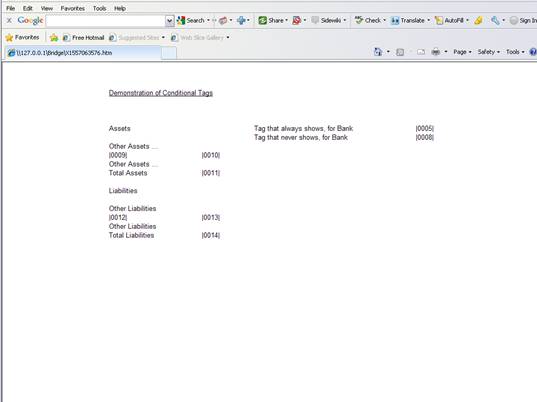
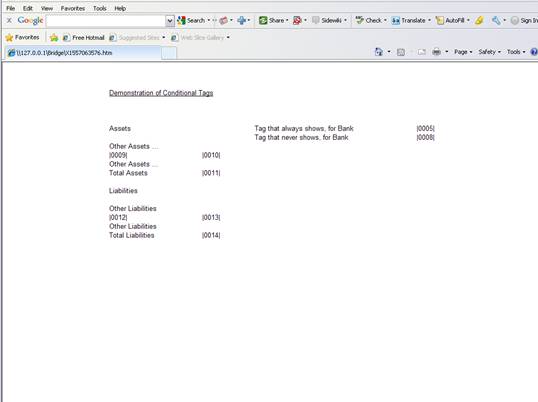
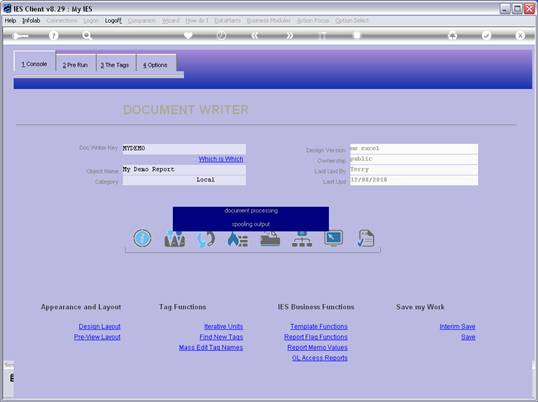
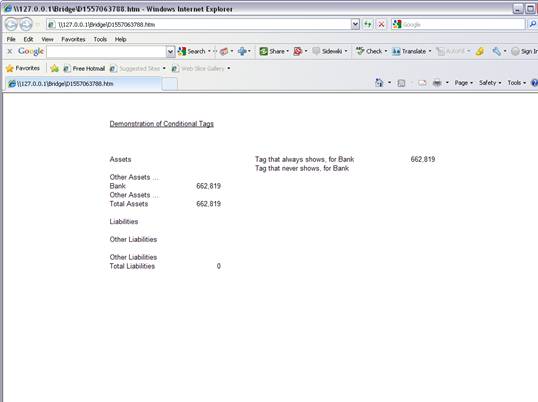
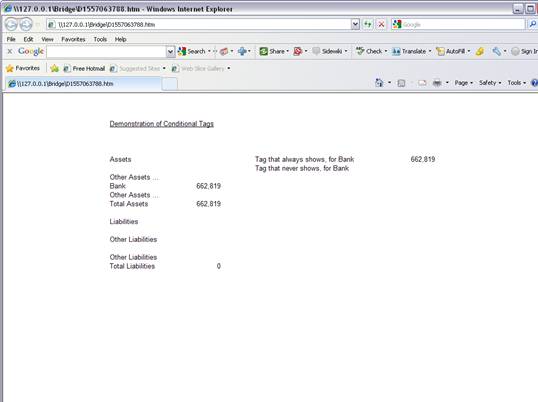
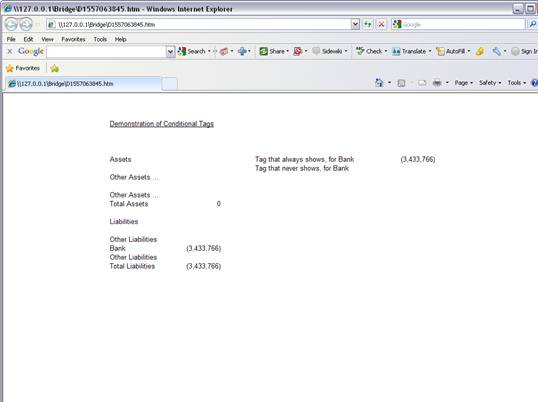
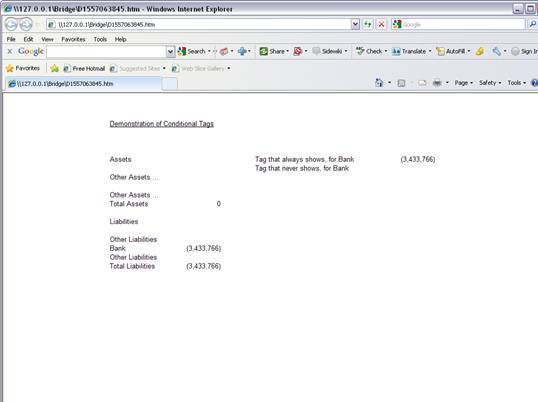
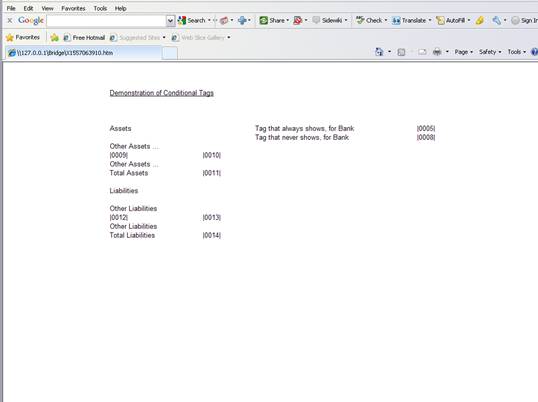
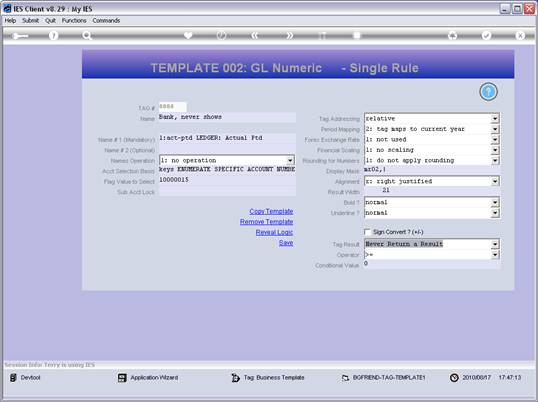
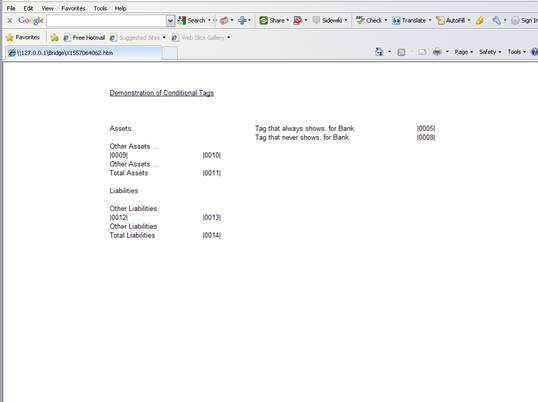
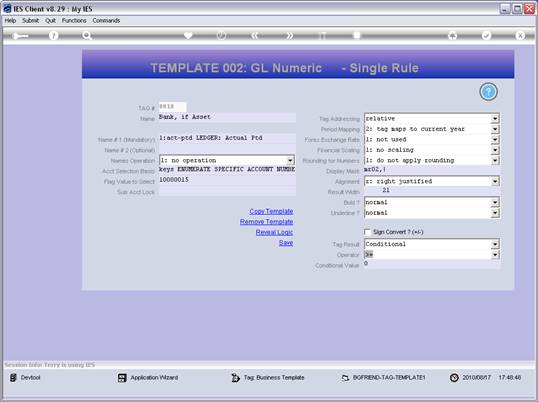
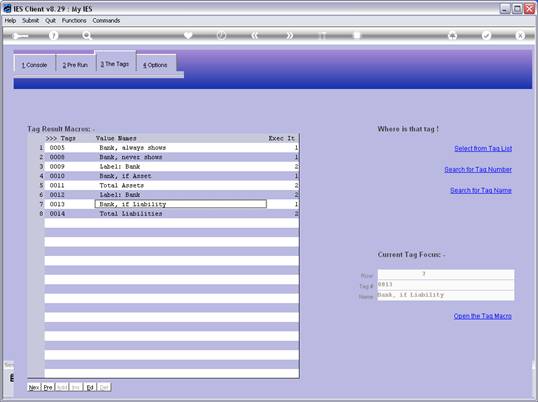
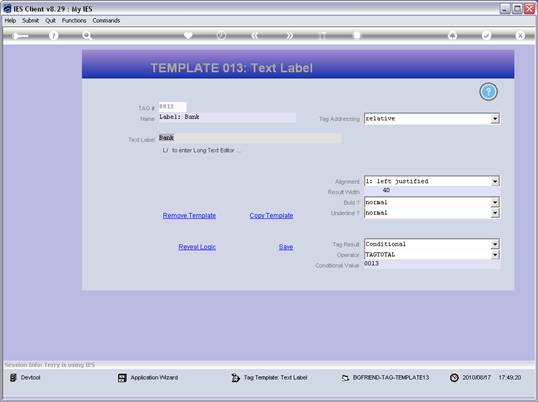
Slide notes: And here we have an interesting example of how we can use 'moving' Tags. In this case, we pretend that this is an extract from a Balance Sheet, and the Bank Account can be healthy or it can be in overdraft. We never know which of the 2 it is going to be when the Report is produced, and therefore we have it at Assets as well as at Liabilities. However, in any Report output it should only appear at the Assets OR at the Liabilities, i.e. it should NOT appear at both! So we will use the 'conditional' rules to control when the Tags will show themselves.


Slide 6

Slide notes:


Slide 7

Slide notes:


Slide 8

Slide notes:


Slide 9

Slide notes: So therefore, Tags 9 & 10, as well as Tags 12 & 13 are all Conditional Tags. When 9 & 10 show, then 12 & 13 will not, and vice versa.


Slide 10

Slide notes:


Slide 11

Slide notes:


Slide 12

Slide notes:


Slide 13

Slide notes:


Slide 14

Slide notes:


Slide 15

Slide notes: We now test the Report as at September 2009, when the Bank Account has a healthy balance, and must appear at the Assets section.


Slide 16

Slide notes:


Slide 17

Slide notes:


Slide 18

Slide notes:


Slide 19

Slide notes: As we can see here, the label for 'Bank' appears at the Assets section and so does the Bank Balance.


Slide 20

Slide notes:


Slide 21

Slide notes:


Slide 22

Slide notes: Even though there are Tags for the Bank at the Liabilities section, they do not show.


Slide 23

Slide notes:


Slide 24

Slide notes:


Slide 25

Slide notes:


Slide 26

Slide notes: Also, the Tag that must always show a Result is showing it, and the other that must never show a result is not showing any.


Slide 27

Slide notes:


Slide 28

Slide notes: Now we will run the same test again, this time at a later Period and where the Bank Balance is in overdraft, therefore we expect it to appear at the Liabilities section and not at the Assets section.


Slide 29

Slide notes:


Slide 30

Slide notes:


Slide 31

Slide notes:


Slide 32

Slide notes:


Slide 33

Slide notes:


Slide 34

Slide notes:


Slide 35

Slide notes:


Slide 36

Slide notes:


Slide 37

Slide notes:


Slide 38

Slide notes:


Slide 39

Slide notes:


Slide 40

Slide notes:


Slide 41

Slide notes:


Slide 42

Slide notes:


Slide 43

Slide notes:


Slide 44

Slide notes: The results are all as expected.


Slide 45

Slide notes: Back at the Layout, we see that Tag 5 is the one that must always show a Value.


Slide 46

Slide notes:


Slide 47

Slide notes:


Slide 48

Slide notes:


Slide 49

Slide notes: And the reason it does is because the Tag Result field says: Always Return a Result.


Slide 50

Slide notes:


Slide 51

Slide notes: Tag 8 has the same Value as Tag 5, but it is not allowed to show it's Value in the final Report.


Slide 52

Slide notes:


Slide 53

Slide notes:


Slide 54

Slide notes:


Slide 55

Slide notes: Tag Result says: Never Return a Result.


Slide 56

Slide notes:


Slide 57

Slide notes: Tag 10 will only show when it's result is >= zero, and Tag 9 will only show if Tag 10 is showing.


Slide 58

Slide notes:


Slide 59

Slide notes:


Slide 60

Slide notes:


Slide 61

Slide notes:


Slide 62

Slide notes:


Slide 63

Slide notes:


Slide 64

Slide notes: The answer for the Bank Balance is exactly the same on all the Tags that reference it, but the Conditional Rules are different. Here at Tag 10, we see that the Tag Result is 'Conditional'.


Slide 65

Slide notes: It must be tested to be >= zero otherwise it is not allowed to show.


Slide 66

Slide notes:


Slide 67

Slide notes:


Slide 68

Slide notes:


Slide 69

Slide notes:


Slide 70

Slide notes:


Slide 71

Slide notes: Whereas at Tag 13, the Tag may only show itself if the answer is < zero.


Slide 72

Slide notes:


Slide 73

Slide notes:


Slide 74

Slide notes:


Slide 75

Slide notes:


Slide 76

Slide notes:


Slide 77

Slide notes: The Labels that produce the word 'Bank' on either line is again dependent on whether the Bank Balance is showing on that line or not. So Tag 9 is dependent on Tag 10 having a Value that shows or not.


Slide 78

Slide notes:


Slide 79

Slide notes:


Slide 80

Slide notes:


Slide 81

Slide notes:


Slide 82

Slide notes:


Slide 83

Slide notes:


Slide 84

Slide notes: We note also that the 'Bank' labels appear before their dependent Tags in the calculation, therefore they are raised to the next execution level so that their dependent Tag values are known by the time they are calculated.


Slide 85

Slide notes:


Slide 86

Slide notes:


Slide 87

Slide notes:


Slide 88

Slide notes:


Slide 89

Slide notes:


Slide 90

Slide notes:


Slide 91

Slide notes:


Slide 92

Slide notes:


Slide 93

Slide notes: So now we know how to put Conditional Tags to good use.